Description
Deploy a Java web app to AWS Lightsail using Jenkins for CI/CD. Learn how to launch, automate, and scale your app with this hands-on tutorial.
Are you looking for a fast, affordable, and beginner-friendly way to deploy your Java app to the cloud?
In this guide, you'll learn how to:
- Launch an AWS Lightsail instance
- Use Jenkins to build and deploy a containerized Java web application
- Scale your application smartly
Introduction
AWS Lightsail
AWS Lightsail is a lightweight Virtual Private Server (VPS) service by Amazon Web Services, perfect for developers and small teams looking to deploy applications without diving into complex AWS configurations.
Key Features of AWS Lightsail
Straightforward Pricing with Predictable Costs
One of Lightsail’s biggest advantages is its flat-rate pricing model. Unlike EC2’s pay-as-you-go model, Lightsail bundles compute resources, SSD storage, and data transfer into fixed monthly plans, starting as low as $5/month. This makes budgeting easier, especially for developers working on side projects or small teams managing costs without sacrificing performance.
Quick Instance Setup and Pre-configured Applications
Starting with AWS Lightsail is incredibly easy. Users can launch a virtual machine (instance) in just a few clicks. You can choose your preferred operating system (Linux or Windows) or select from a range of pre-configured application stacks such as WordPress, Node.js, LAMP, and more. This allows developers to skip lengthy server setup processes and get their applications online faster.
Built-in Networking and Management Tools
Lightsail includes several built-in tools to simplify server management. Users can easily assign static IPs, configure DNS settings, manage firewalls, and even integrate load balancers for high availability setups. These features are accessible via a user-friendly web interface, which removes the need for complex networking configurations typically associated with EC2 or other AWS infrastructure.
Snapshots, Backups, and High Availability
Data protection and recovery are made simple through Lightsail’s snapshot feature. You can create snapshots of your instances and storage volumes either manually or automatically. These snapshots can be used to restore data quickly or clone environments for testing or scaling. Lightsail also supports high availability by allowing load balancer integration and deploying across different availability zones.
Seamless Migration to EC2
When your project outgrows Lightsail’s capabilities, migrating to EC2 is straightforward. Lightsail offers a built-in export tool that converts your instance into an EC2-compatible AMI. This makes it easy to transition to a more flexible and powerful AWS environment while maintaining your application setup and configurations.
Ideal Use Cases
AWS Lightsail is best suited for lightweight workloads and projects that require quick deployment and minimal maintenance. It is ideal for:
-
Hosting blogs, portfolios, and e-commerce websites
-
Running small-scale web applications and APIs
-
Creating development or staging environments
-
Deploying MVPs (Minimum Viable Products)
-
Students or beginners learning server deployment
Prerequisites
Please ensure you have the following before we begin:
- An AWS account
- Jenkins installed (locally or remotely)
- Apache Maven installed (locally or remotely)
- A Java project (using Maven or Gradle)
- Docker installed (locally or remotely)
- Basic familiarity with terminal commands
Step 1: Create a Lightsail Instance
- Visit AWS Lightsail
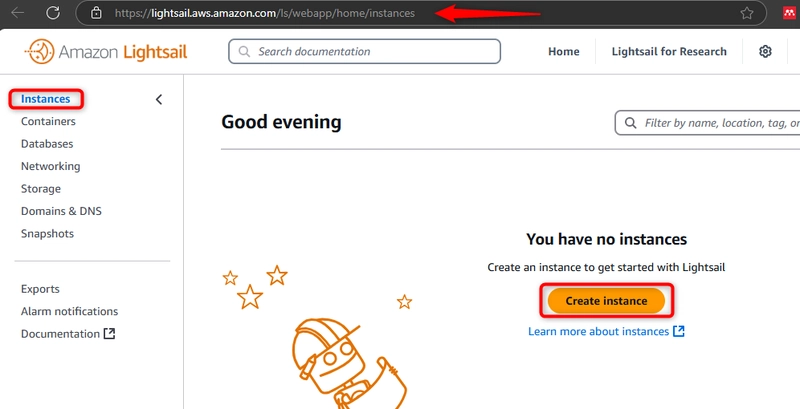
-
Click Create instance
-
Select your instance location. For this project, I chose Virginia
us-east-1region.

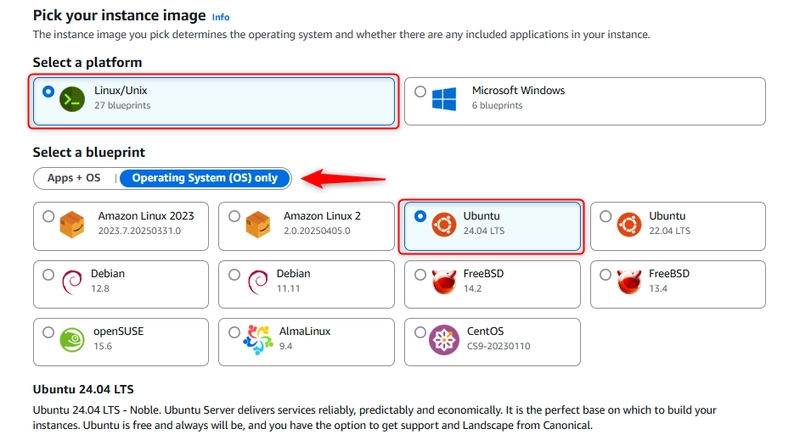
- Choose your instance image; this is the operating system.
- Platform: Linux/Unix
- Blueprint: OS-only (Ubuntu) For this demo, I chose Ubuntu distribution of Linux operating system without any Apps added.
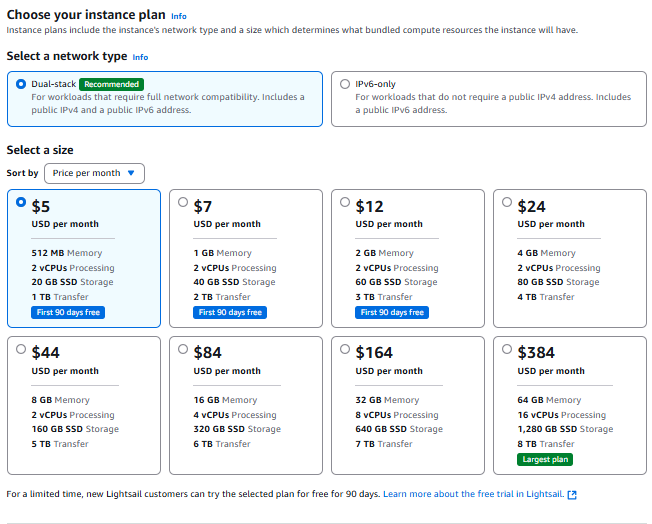
- Pick an instance plan from (as low as $5/month). This is one of the major benefits of the AWS Lightsail it removes the unpredictability of cloud costs and allows small businesses to operate within a tight budget.
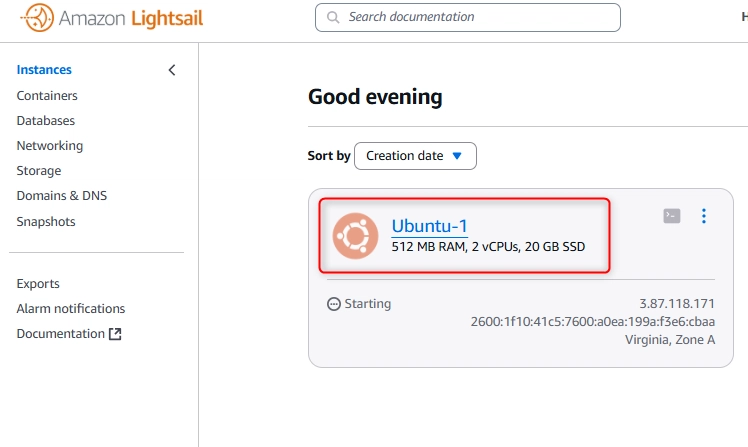
- Give your instance a unique name; this will enable you to identify it, and then click on the Create Instance button to launch it.
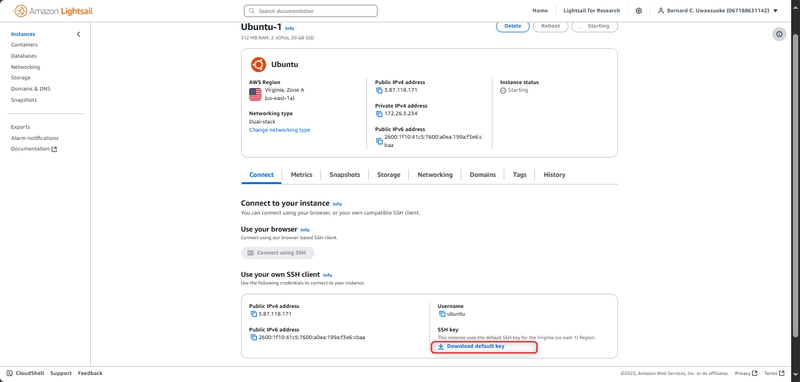
The instance starting
- Click on the Instance icon to see the details
- Download the
.pemprivate SSH key. You need this to connect to the instance from an SSH agent or terminal. For this project, we connected directly from the Lightsail management console.
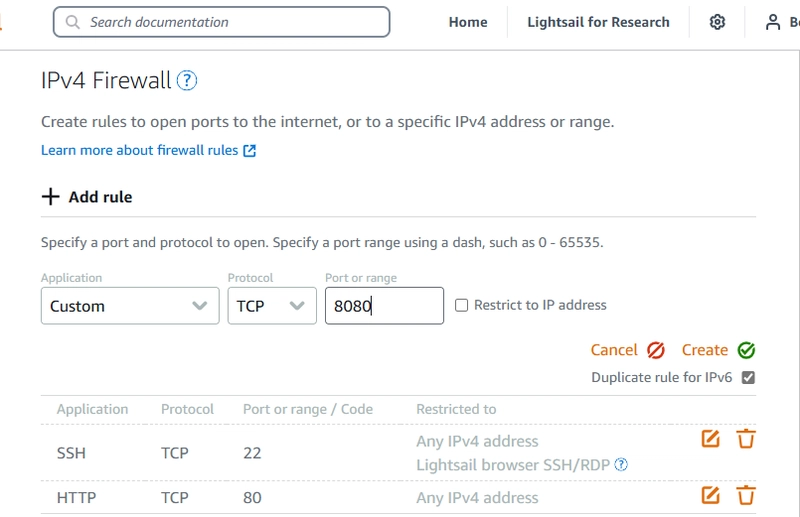
- Click on the Networking tab and scroll down to IPv4 Firewall under it click on Add rule. This will open a pane to configure inbound rule. Under Application, select Custom, for Protocol select TCP and Port or range enter 8080.
Step 2: Connect to Your Instance
Use the command below if you are connecting from a command line.
ssh -i ~/Downloads/lightsail.pem ubuntu@your-lightsail-ip
For this project, I will be connecting from the Lightsail console.
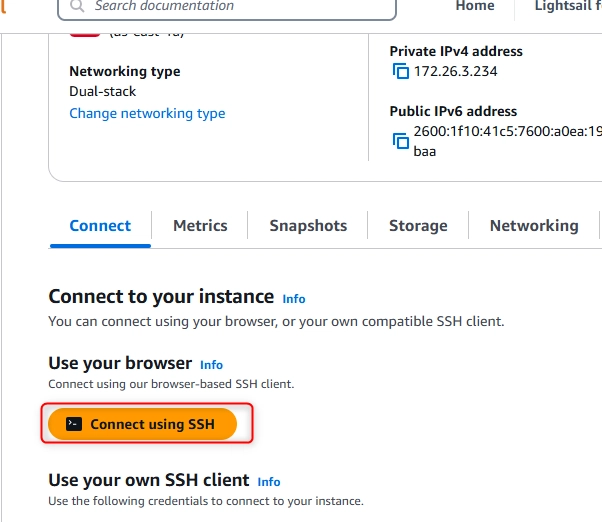
The Ubuntu Lightsail Instance Terminal

Once connected, run the following commands to update the server and install Java and Docker:
sudo apt update && sudo apt upgrade -y

sudo apt install -y default-jdk

java -version

sudo apt install -y apt-transport-https ca-certificates curl software-properties-common gnupg lsb-release

curl -fsSL https://download.docker.com/linux/ubuntu/gpg | sudo gpg --dearmor -o /usr/share/keyrings/docker-archive-keyring.gpg

echo \
  "deb [arch=$(dpkg --print-architecture) signed-by=/usr/share/keyrings/docker-archive-keyring.gpg] \
  https://download.docker.com/linux/ubuntu \
  $(lsb_release -cs) stable" | \
  sudo tee /etc/apt/sources.list.d/docker.list > /dev/null

sudo apt update

sudo apt install -y docker-ce docker-ce-cli containerd.io

docker --version
sudo systemctl status docker

sudo usermod -aG docker $USER
newgrp docker
Checking Java Version

Step 3: Deploy the Application
- Clone the Project Repository: Clone the sample Java application repository from GitHub.
git clone https://github.com/Donhadley22/practice-java-app.git
This repository contains a basic Java project, Dockerfile and Jenkinsfile. These will be used to build a Docker image, test, and deploy the application to AWS Lightsail.
Here is the Jenkinsfile:
pipeline {
  agent any
     tools {
    maven 'maven-3.9.9'
  }

  environment {
    DOCKER_IMAGE          = 'donhadley/peabsmartapp'
    DOCKERFILE            = 'Dockerfile'
    DOCKER_REGISTRY       = 'index.docker.io/v1'
    DOCKER_CREDENTIALS_ID = 'dockerhub-creds'
    DOCKER_TAG            = "${env.BUILD_NUMBER}"
    LS_INSTANCE_ID       = 'i-05d37916155efbc80'
    LS_REGION            = 'us-east-1'
    SSH_CREDENTIALS_ID    = 'ec2-ssh-key'
    LS_USER              = 'ubuntu'
    LS_HOST              = '52.87.109.141'
    CONTAINER_NAME        = 'peabsmart-app'
    HOST_PORT             = 80
    CONTAINER_PORT        = 8080
  }

  stages {

    stage('Checkout') {
      steps {
        echo 'Checking out code...'
        checkout scm
      }
    }

    stage('Package') {
      steps {
        echo 'Building the Java project and packaging WAR...'
          sh 'mvn clean package'
  }
}

stage('Test') {
      steps {
        echo 'Running tests...'
         sh 'mvn test'
      }
    }
    stage('Build') {
      steps {
        echo 'Building Docker image...'
        script {
          docker.build("${DOCKER_IMAGE}:${DOCKER_TAG}", "-f ${DOCKERFILE} .")
        }
      }
    }

    stage('Push') {
      steps {
        echo 'Pushing Docker image to Docker Hub...'
        script {
          docker.withRegistry('https://index.docker.io/v1/', "${DOCKER_CREDENTIALS_ID}") {
          docker.image("${DOCKER_IMAGE}:${DOCKER_TAG}").push()
      }
    }
  }
}


    stage('Deploy') {
      steps {
        echo 'Deploying to AWS EC2...'
        script {
          sshagent([SSH_CREDENTIALS_ID]) {
            sh """
              ssh -o StrictHostKeyChecking=no ${EC2_USER}@${EC2_HOST} \\
              'docker pull ${DOCKER_IMAGE}:${DOCKER_TAG} && \
              docker stop ${CONTAINER_NAME} || true && \
              docker rm ${CONTAINER_NAME} || true && \
              docker run -d --name ${CONTAINER_NAME} -p ${HOST_PORT}:${CONTAINER_PORT} ${DOCKER_IMAGE}:${DOCKER_TAG}'
             """

          }
        }
      }
    }
  }

  post {
    success {
      echo "✅ Deployed successfully to EC2 🎉"
    }
    failure {
      echo "❌ Deployment failed. Please check the logs for details."
    }
  }
}
// This Jenkinsfile is a declarative pipeline that automates the process of building, testing, and deploying a Dockerized Java application to an AWS instance. It includes stages for checking out the code, building the Docker image, running tests, pushing the image to Docker Hub, and deploying it to the Lightsail instance. The pipeline uses environment variables for configuration and SSH credentials for secure access to the instance.
- Make sure the Jenkins server has:
Access to your .pem key
Maven installed
Correct permissions on the Lightsail instance
-
Setting-up the Jenkins Pipeline job:
-
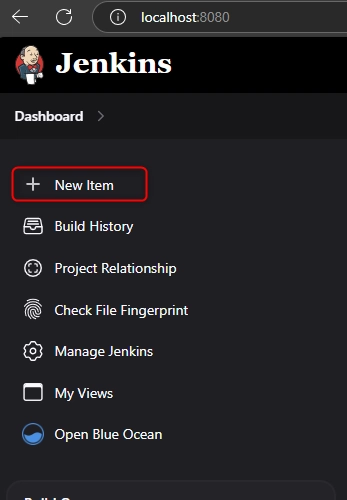
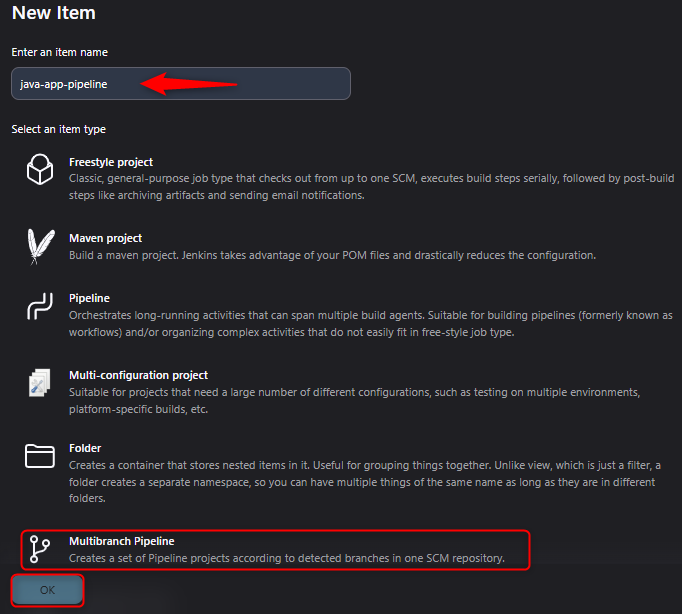
Login to Jenkins with your credentials, and on the Dashboard click on New item.
- On your New item pane, enter the pipeline job name, select Multibranch Pipeline and click OK
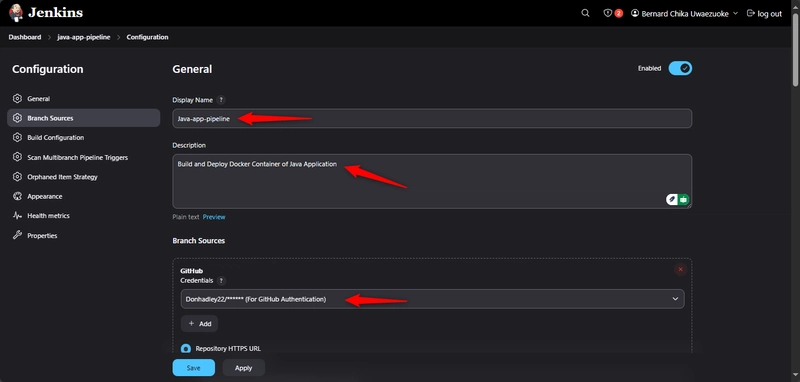
- On the pipeline Configuration pane under General, enter the Display Name and Description of your pipeline job.
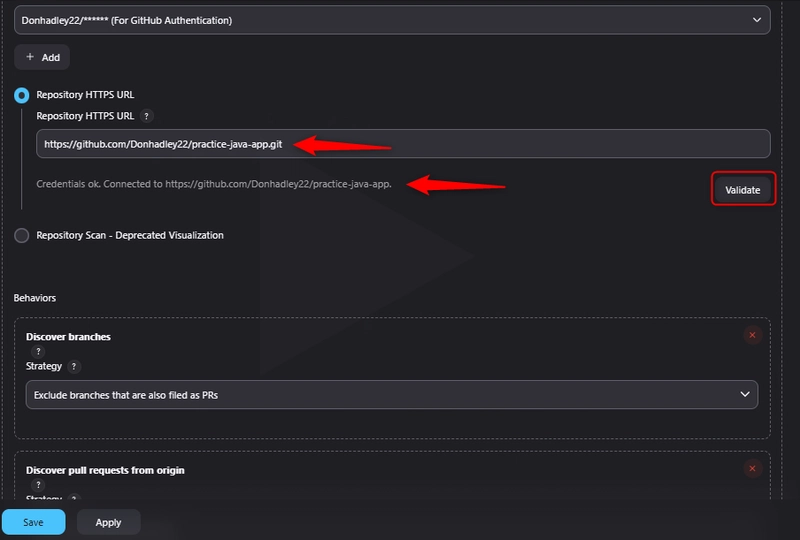
Scroll down to the Branch Sources and select GitHub, enter your GitHub credentials (Username and access token), and select it. Also paste the GitHub HTTP URL under Repository HTTPS URL for this project.
- Click on the Validate button to ensure the credential is okay and Jenkins can access the repository in GitHub.
- In Build Configuration, under Mode, enter by Jenkinsfile and Script Path Jenkinsfile. In most cases Jenkins does these automatically.
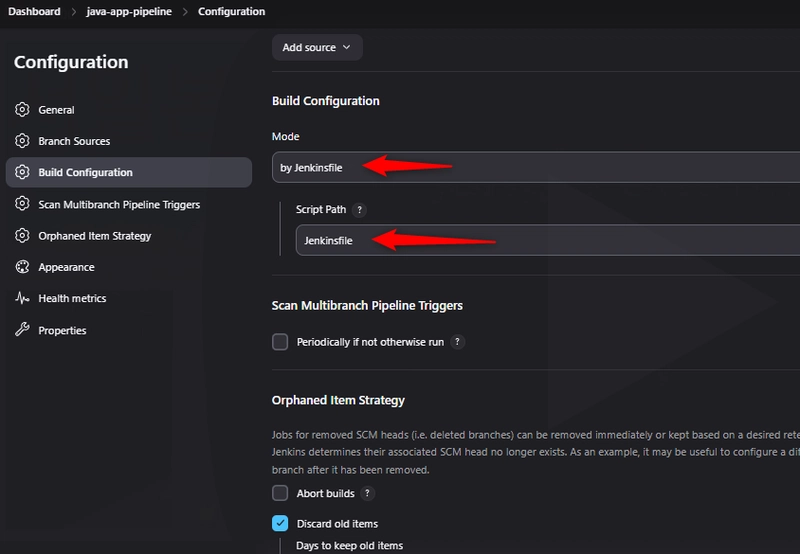
- Click Save and Jenkins will scan the Repository to find the Jenkinsfile.
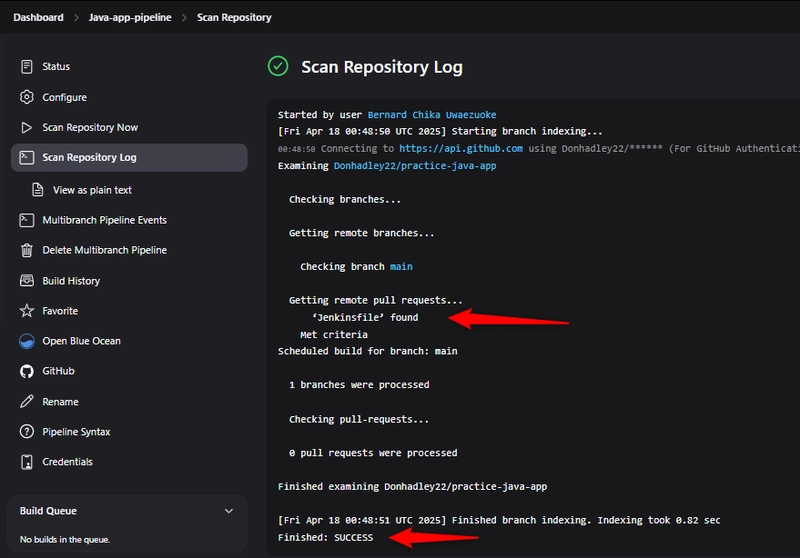
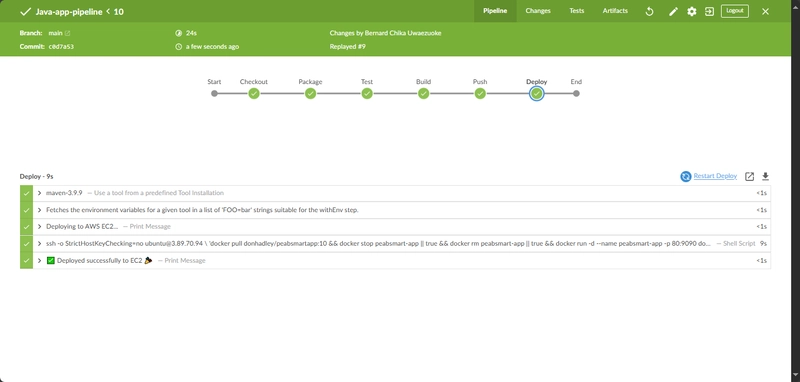
- Go to the Jenkins Dashboard, Click on the pipeline you just created and select Build now. This will trigger the job to run the various stages declared in the Jenkinsfile.
Step 4: Access Your Java App
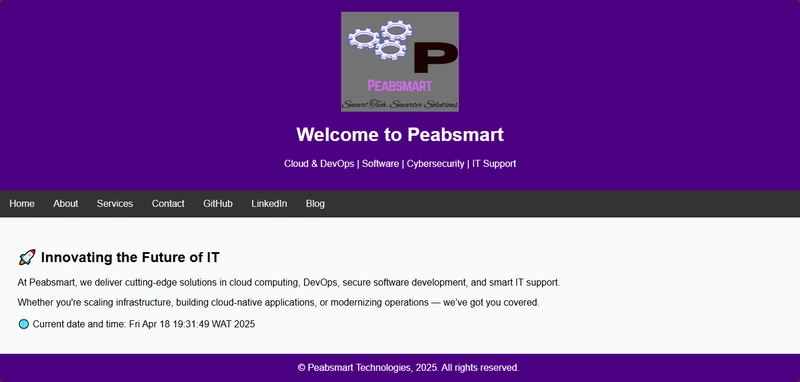
Once deployed, visit:
http://<your-lightsail-ip>:8080
Your Java app should now be live!
Make use of the Public IP Address of your Lightsail instance.
Scale Smartly with AWS Lightsail
Scale with Confidence!
These are Lightsail features that grow with you and your business,
Add Snapshots for Backup and Disaster Recovery.
Snapshots in Amazon Lightsail allow you to create point-in-time backups of your instances, databases, and block storage disks. These snapshots can be used to restore your resources in case of data loss or to create new resources based on the snapshot.
How to create a snapshot
- Navigate to the Lightsail console.
Select your** Instance**.
Go to the Snapshots tab.
Click Create snapshot, provide a name, and confirm.
You can also enable automatic snapshots to have Lightsail create daily backups during a specified time window.
Use a Load Balancer for High Availability
Lightsail Load Balancers distribute incoming traffic across multiple instances, enhancing the availability and fault tolerance of your application. They automatically perform health checks and route traffic only to healthy instances.
Steps to set up a load balancer
In the Lightsail console, go to the Networking tab.
Click Create Load Balancer.
Assign a name and select the region.
Attach your instances to the load balancer.
This setup ensures that your application remains accessible even if one or more instances fail. This is only applicable when you have at least two or more Lightsail instances running same application.
Attach Additional Storage Blocks
As your data grows, you might need more storage. Lightsail Block Storage allows you to attach additional SSD-backed storage disks to your instances.
To add and attach a storage disk
In the Lightsail console, select your instance.
Go to the Storage tab and click Create disk.
Specify the disk size and name.
After creation, attach the disk to your instance.
Connect to your instance via SSH to format and mount the new disk.
Use Lightsail Containers for Docker Apps
Lightsail Container Services enable you to deploy and manage containerized applications without managing the underlying infrastructure. You can push your Docker images directly or use images from public registries.
Deploying a containerized application
In the Lightsail console, navigate to Containers on the left pane.
Click Create container service.
Define the service name, power, and scale.
Add your container by specifying the image and deployment settings.
Deploy the service and access it via the provided endpoint.
Seamless Migration to EC2 or ECS
When your application outgrows Lightsail's capabilities, you can migrate to Amazon EC2 or Amazon ECS for more advanced features.
Migrating to EC2:
Create a snapshot of your Lightsail instance.
In the Snapshots tab, select the snapshot and click Export to Amazon EC2.
Follow the prompts to create an Amazon Machine Image (AMI) in EC2.
Launch a new EC2 instance using the exported AMI.
This process allows you to retain your application's configuration and data while transitioning to a more scalable environment.
Summary
In this guide, you learned how to deploy and manage a Java application using Amazon Lightsail, integrating essential DevOps practices for scalability and reliability.
You began by launching a Lightsail instance, selecting the appropriate operating system and instance plan tailored to your application's needs. This process provided you with a virtual private server equipped with a static IP, enabling consistent access and management.
Next, you configured a Jenkins pipeline job on your existing Jenkins server, integrating it with your GitHub repository containing the application code and Jenkinsfile. This setup enabled automated builds and deployments, ensuring that code changes are efficiently tested and deployed.
You then deployed your Java application as a Docker image to the server. By containerizing your application, you ensured consistency across development and production environments, simplified dependency management, and facilitated scalability.
Jenkins
To prepare for future growth and ensure high availability, you explored scaling strategies. This included adding snapshots for backup and disaster recovery, using load balancers to distribute traffic across multiple instances, attaching additional storage blocks to accommodate growing data needs, and leveraging Lightsail Containers for deploying Dockerized applications. These features empower you to scale your application seamlessly and maintain uptime during peak usage.
Finally, you learned about the seamless migration path from Lightsail to more advanced AWS services like EC2 or ECS. This transition allows you to leverage a broader set of tools and configurations as your application's requirements evolve.
By following this guide, you've established a robust foundation for deploying, managing, and scaling your Java application in the cloud, ensuring resilience and adaptability in a dynamic digital landscape.
Ready to Elevate Your DevOps Journey?
I hope this guide has provided you with valuable insights into deploying and managing your Java application using Amazon Lightsail. If you have any questions, need further clarification, or have suggestions for future topics, feel free to reach out.
Stay connected by following my blog for more tutorials and updates. Your feedback and engagement are always welcome!
Tidak ada komentar:
Posting Komentar